
Are you trying to develop a client server application but are coming up against all sorts of problems? We certainly did and that’s why we developed NetworkComms.Net. You can follow this quick tutorial to create a client server application in just several minutes.
If you are looking for something a little more advanced please also see how to create a WPF client server chat application. Please also checkout our features section to find out just how powerful our network library is.
Before we get started ensure you have one of the NetworkComms.Net packages (if not please see our download page) and Visual Studio 2010 Express or later installed, which should come with .Net4 or later.
Start your timers now.
1. Create Visual Studio Projects
- Create a new visual studio solution named ‘ ClientServerExample ‘ containing a Visual C# ‘ Console Application ‘ project naming it ‘ ClientApplication ‘.
- Once created add a second Visual C# ‘ Console Application ‘ project naming it ‘ ServerApplication ‘.
- You should now have something that looks like this:
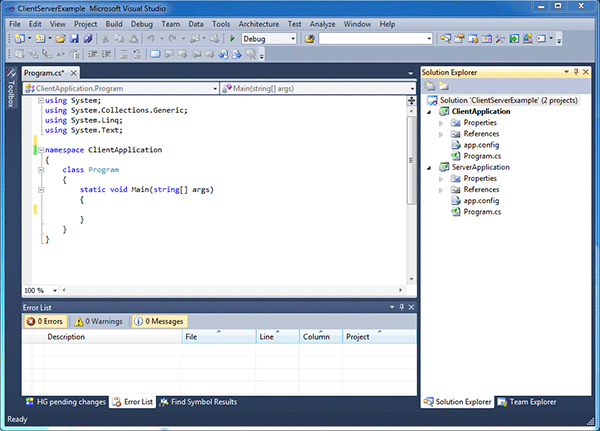
Visual studio solution containing the empty projects.
2. Add NetworkComms.Net DLL To Projects
- The NetworkComms.Net download contains DLLs for all supported platforms but we are only interested in the Net40 > Release > Complete DLL. Copy this DLL to the same location as the solution we created in step 1.
- We now need to add project references to the NetworkComms.Net DLL we just downloaded. Right click on the ‘ ClientApplication ‘ project and select ‘ Add Reference… ‘. Within the window that opens select the Browse tab and select the DLL we just downloaded. Repeat this step for the ‘ ServerApplication ‘ project.
- If you expand the ‘ References ‘ folder within both projects you should see the NetworkComms.Net references you just added like this:
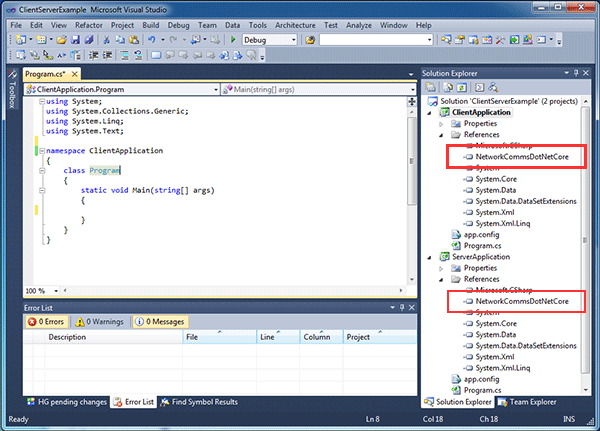
Visual studio solution containing the projects which now have references to the NetworkCommsDotNet Core DLL.
3. Copy & Paste Client Source Code
- Copy and paste the following code into the ‘ ClientApplication ‘ project replacing ALL EXISTING code in the file ‘ Program.cs ‘. Note the highlighted line which is the only line required to actually send an object to the server.
using System;
using System.Collections.Generic;
using System.Linq;
using System.Text;
using NetworkCommsDotNet;

namespace ClientApplication
{
    class Program
    {
        static void Main(string[] args)
        {
            //Request server IP and port number
            Console.WriteLine("Please enter the server IP and port in the format 192.168.0.1:10000 and press return:");
            string serverInfo = Console.ReadLine();

            //Parse the necessary information out of the provided string
            string serverIP = serverInfo.Split(':').First();
            int serverPort = int.Parse(serverInfo.Split(':').Last());

            //Keep a loopcounter
            int loopCounter = 1;
            while (true)
            {
                //Write some information to the console window
                string messageToSend = "This is message #" + loopCounter;
                Console.WriteLine("Sending message to server saying '" + messageToSend + "'");

                //Send the message in a single line
                NetworkComms.SendObject("Message", serverIP, serverPort, messageToSend);

                //Check if user wants to go around the loop
                Console.WriteLine("\nPress q to quit or any other key to send another message.");
                if (Console.ReadKey(true).Key == ConsoleKey.Q) break;
                else loopCounter++;
            }

            //We have used comms so we make sure to call shutdown
            NetworkComms.Shutdown();
        }
    }
}
4. Copy & Paste Server Source Code
- Copy and paste the following code into the ‘ ServerApplication ‘ project replacing ALL EXISTING code in the file ‘ Program.cs ‘. Note the highlighted lines which is all that is required to setup the server.
using System;
using System.Collections.Generic;
using System.Linq;
using System.Text;
using NetworkCommsDotNet;
using NetworkCommsDotNet.Connections;

namespace ServerApplication
{
    class Program
    {
        static void Main(string[] args)
        {
            //Trigger the method PrintIncomingMessage when a packet of type 'Message' is received
            //We expect the incoming object to be a string which we state explicitly by using <string>
            NetworkComms.AppendGlobalIncomingPacketHandler<string>("Message", PrintIncomingMessage);
            //Start listening for incoming connections
            Connection.StartListening(ConnectionType.TCP, new System.Net.IPEndPoint(System.Net.IPAddress.Any, 0));

            //Print out the IPs and ports we are now listening on
            Console.WriteLine("Server listening for TCP connection on:");
            foreach (System.Net.IPEndPoint localEndPoint in Connection.ExistingLocalListenEndPoints(ConnectionType.TCP))
                Console.WriteLine("{0}:{1}", localEndPoint.Address, localEndPoint.Port);

            //Let the user close the server
            Console.WriteLine("\nPress any key to close server.");
            Console.ReadKey(true);

            //We have used NetworkComms so we should ensure that we correctly call shutdown
            NetworkComms.Shutdown();
        }

        /// <summary>
        /// Writes the provided message to the console window
        /// </summary>
        /// <param name="header">The packet header associated with the incoming message</param>
        /// <param name="connection">The connection used by the incoming message</param>
        /// <param name="message">The message to be printed to the console</param>
        private static void PrintIncomingMessage(PacketHeader header, Connection connection, string message)
        {
            Console.WriteLine("\nA message was received from " + connection.ToString() + " which said '" + message + "'.");
        }
    }
}
5. Run Your Client Server Application
- Ensure Visual Studio is set to build in ‘ Debug ‘ mode and then build all projects by pressing ‘F6’. An alternative is to right click the Solution file in visual studio and select ‘ Build Solution ‘.
- Browse to the compiled directory for both the client and server application. The quickest way to do this is to right click on each project and select ‘ Open Folder In Windows Explorer ‘. Within the folder that opens look for a directory named ‘ bin ‘ and then inside that ‘ Debug ‘.
- Run an instance of ‘ ServerApplication.exe ‘. You may see a Firewall notification at this point so it is important to give the application the appropriate permissions. You should see something like this, although expect the IP addresses to be different:
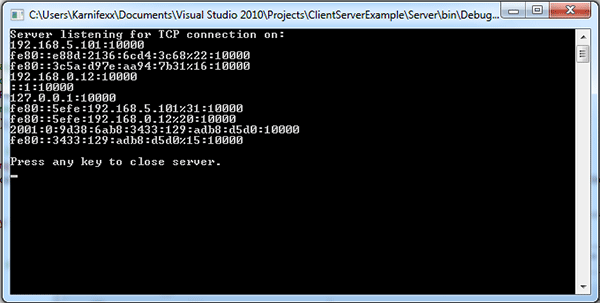
The expected output of ServerApplication.exe
- Run an instance of the ‘ ClientApplication.exe ‘. The first piece of information you are required to enter is a valid IP address and port for the server. Look at the output of the ‘ ServerApplication.exe ‘ and select an appropriate IP address and port. If testing locally the best address will most likely start ‘127.0.x.x’, ‘192.168.x.x’ or ’10.x.x.x’. Remember to follow the IP address with a colon, ‘:’, and then the port number. Once you press enter you should see the server has received its first message. From this point on just follow the instructions presented in the client.
You have successfully created a client server application using NetworkComms.Net. Stop your timers now.
If You Have Problems
- Ensure you have correctly configured your firewall to allow the necessary traffic.
- If you are still have issues please post on our forums and we will be more than happy to help.
Things To Be Aware Of
- Exception Handling – In a completed application it would be necessary to add exception handling to the client and server. There are error conditions where there is no appropriate default action, such as a target server being unavailable. In these cases you need to catch the exception and decide on your own preferred course of action. Please see our article on exception handling for more information.
For More Information
- See our Getting Started article.
- See our creating a wpf chat application article which starts to cover some of the more sophisticated features.
- See our online API Reference which explains what all of the methods do.
- Ask any questions on our forums .